What if you could transform kitchen scraps and yard waste into rich, dark soil amendment with just a few simple tools? It’s possible, and it starts with understanding how to properly aerate your compost pile. These homemade aerators work with nature rather than against it, creating healthier soil for your garden while reducing waste. The magic happens when you give your compost the oxygen it needs to break down efficiently.
Composting is one of the most rewarding ways to recycle organic waste while creating nutrient-rich soil for your garden. But even the best compost piles can suffer from poor aeration, leading to slow decomposition, foul odors, and unhealthy soil outcomes. This is where compost aerators come in – they’re the unsung heroes that ensure your compost pile gets the oxygen it needs to thrive. The beauty of building your own aerator lies in its simplicity, sustainability, and effectiveness. Whether you’re a seasoned gardener or just starting out, understanding how to properly aerate compost can dramatically improve your results. These DIY tools aren’t just helpful – they’re essential for anyone serious about soil health and environmental stewardship.
Understanding Compost Aeration Basics
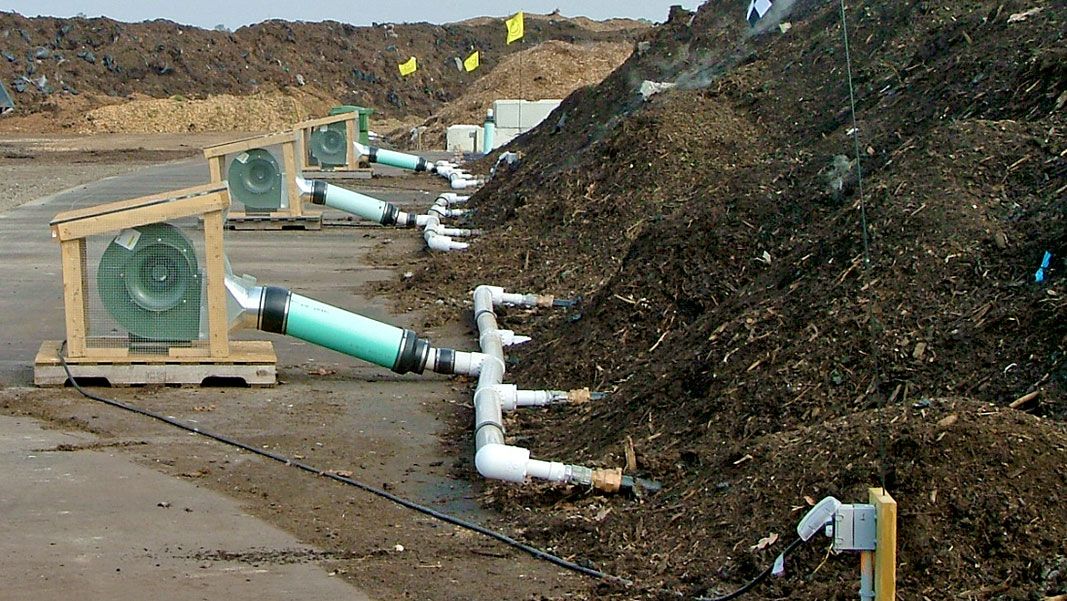
Compost aeration is the process of introducing oxygen into decomposing organic matter. Think of it like breathing – without oxygen, the microorganisms that break down your materials can’t function properly. When you aerate compost, you’re essentially giving these tiny workers the air they need to do their job effectively. The key is maintaining the right balance between moisture and airflow. Too much water and you suffocate the beneficial microbes; too little and the decomposition slows to a crawl. Proper aeration creates the ideal environment for aerobic bacteria to break down organic matter quickly and efficiently. These microorganisms are responsible for turning your kitchen scraps and yard waste into rich, dark humus that gardeners love. Without adequate aeration, your compost pile becomes anaerobic, which means it’s working without oxygen. This leads to unpleasant smells, slower decomposition, and less beneficial soil amendments.
Why Eco-Friendly Materials Matter
Building compost aerators from sustainable materials isn’t just good for the planet – it’s also practical. Using recycled or repurposed items reduces costs and environmental impact while still providing excellent performance. Many traditional aerators are made from plastic or treated wood that may leach chemicals into your soil over time. Natural materials like untreated wood, bamboo, or metal from old appliances offer safer alternatives. Bamboo is particularly great because it’s renewable, strong, and naturally pest-resistant. Recycled metal from old garden tools or fence posts can provide durable, long-lasting options. Consider using materials that won’t degrade quickly in outdoor conditions. The goal is creating tools that will last and won’t contaminate your compost. Remember, you’re putting these tools directly into the soil and composting process, so safety and sustainability should be top priorities. Plus, eco-friendly materials often cost less than buying commercial aerators, making them accessible to everyone regardless of budget.
Simple DIY Aerator Designs You Can Build
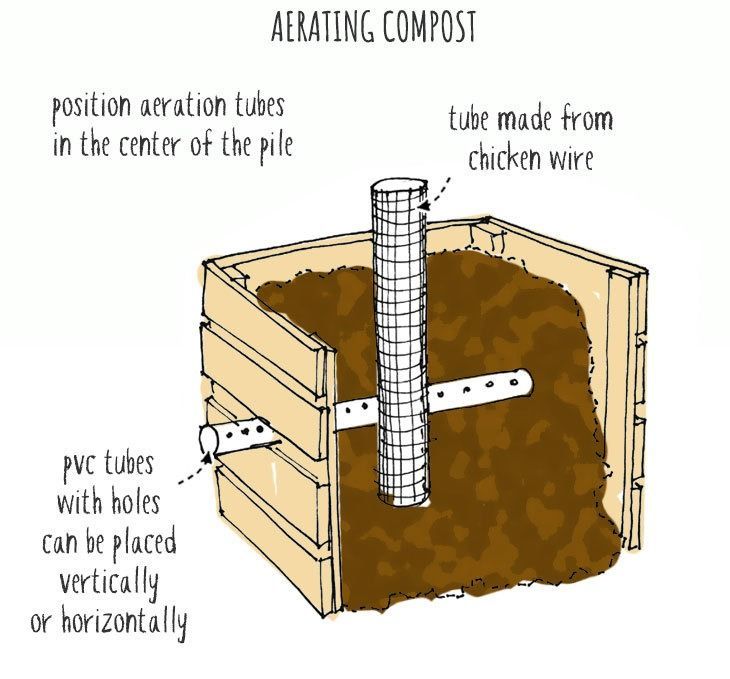
There are several straightforward designs that anyone can construct with basic tools and materials. One popular option is the simple wooden dowel aerator, which involves drilling holes in a long wooden rod. Another common design uses PVC pipes cut to length and drilled with holes. You can also build a sturdy metal rod version using old fence posts or rebar. The key is creating something that can easily penetrate deep into your compost pile without bending or breaking. For beginners, start with a basic design and gradually add complexity as you gain experience. Some people prefer the classic spiral design that can be twisted into compost piles, while others swear by straight rods that are simply pushed in and pulled out. The most important thing is choosing a design that matches your pile size and your comfort level with construction. Most people find that a simple wooden or metal rod works well for small to medium-sized compost bins.
Essential Tools and Materials Needed
Before starting your project, gather these essential supplies: wooden dowels or metal rods, drill bits, measuring tape, sandpaper, and safety equipment. You’ll also want some basic tools like a drill, saw, and screwdriver. For wooden versions, choose untreated hardwood that won’t rot or splinter. Metal rods should be straight and rust-resistant. If you’re using recycled materials, inspect them carefully for any sharp edges or damage. Safety gear like gloves and eye protection is crucial during construction. The materials you choose depend on your local availability and budget. Some people prefer to use old fence posts or scrap metal from local construction sites. Others opt for new materials from hardware stores. The important thing is ensuring your materials are safe for soil contact and will last through multiple uses. Budget considerations vary widely, but you can build functional aerators for under $20 using basic materials.
Step-by-Step Construction Process
The construction process starts with measuring and marking your materials. For wooden aerators, measure the desired length and drill holes every 6 inches along the rod. Make sure holes are large enough for air to flow but not so big they compromise structural integrity. Sand all surfaces smooth to prevent splinters. If using metal, clean and treat surfaces to prevent rust. The most critical step is ensuring proper hole placement and size. Too few holes and you won’t get adequate airflow; too many and the aerator may break apart. Test fit your aerator before final assembly. Most people find it helpful to create a prototype first to test the design. Once satisfied with the prototype, build additional units for regular use. Remember to consider the depth of your compost pile when determining the length of your aerator. A 2-foot-long aerator works well for most home compost bins, but larger piles may need longer tools.
Proper Usage and Maintenance Tips
Using your homemade aerator correctly makes all the difference in compost quality. Insert the aerator vertically into the pile, moving it around to create channels for airflow. Don’t just poke once and move on – proper aeration requires creating multiple pathways. The frequency depends on pile size and decomposition speed, but most composters aerate every 2-4 weeks. Regular maintenance keeps your aerators in good condition. Clean them after each use and check for wear or damage. Store them properly to prevent warping or rusting. Some people use a simple cleaning routine involving soap and water, while others prefer to let them weather naturally. Keep spare parts on hand for repairs. Regular use and proper care will extend the life of your aerators significantly. The key is consistency – make aeration part of your regular composting routine, not an afterthought.
Building your own eco-friendly compost aerators is a rewarding investment in both your garden and the environment. These tools might seem simple, but they play a crucial role in creating healthy, nutrient-rich soil that supports thriving plants. The satisfaction of creating something useful from basic materials is unmatched, and the results speak for themselves. Your compost will decompose faster, smell better, and produce higher-quality soil amendment. Plus, you’re contributing to waste reduction and sustainable practices. Whether you’re a beginner or experienced composter, investing time in building quality aerators pays dividends in garden productivity. The skills you learn today will serve you well in future gardening projects, and you’ll have a deeper appreciation for the science behind healthy soil. Remember, the best aerators are those that work consistently and safely, so take time to build something that fits your specific needs and conditions.