Think about it. You’ve just finished a bathroom remodel or you’re planning one. The tiles look amazing, the fixtures are gleaming, but there’s one crucial detail that could make or break your whole project – the seals. Whether you’re fixing a leaky tub or installing new caulk around your shower, choosing the right material matters more than you might think. What if we told you that picking the wrong sealant could mean water damage, mold growth, and costly repairs down the road? It’s not just about keeping things watertight – it’s about protecting your investment and ensuring your bathroom stays beautiful for years to come.
Bathrooms are unique spaces where moisture meets daily life in ways that can be both beautiful and problematic. Water vapor, frequent use, temperature changes, and cleaning products all work together to challenge whatever materials you use for sealing. That’s why understanding how to choose the right sealing materials isn’t just helpful – it’s essential. Think of sealing as the unsung hero of bathroom maintenance. While everyone notices the fancy tile work or stylish fixtures, it’s those small details like properly sealed joints that keep your bathroom functional and attractive. Without proper sealing, even the most stunning bathroom design can quickly become a disaster zone. The good news? With the right knowledge, anyone can master the art of bathroom sealing. It’s not rocket science, but it does require some understanding of materials, conditions, and application techniques. This guide will walk you through everything you need to know, from basic principles to practical tips that will save you time, money, and headaches.
Understanding Bathroom Sealing Challenges
Bathrooms present a unique set of challenges that make sealing different from other areas of your home. First off, humidity levels are constantly high – sometimes reaching 80% or more. This means materials must resist moisture and prevent water penetration. Think about it: every time you take a hot shower, water vapor fills the air. That steam needs somewhere to go, and if your seals aren’t up to snuff, it finds its way through gaps and cracks. Temperature fluctuations also play a role. When the bathroom heats up from a hot shower, materials expand and contract. If they’re not flexible enough, they’ll crack and fail. Then there’s the issue of chemical exposure. Bathroom cleaners, sanitizers, and even soap residues can break down certain sealants over time. Not to mention that bathrooms get constant use, so anything that’s sealed needs to handle wear and tear. These factors combine to make bathroom sealing a bit trickier than sealing a kitchen countertop or basement wall. For example, a standard household caulk that works great on a window frame might fail completely in a bathroom environment. You’re essentially asking a material to perform under conditions that are quite extreme compared to typical indoor environments. The key is matching the sealant properties directly to these environmental demands.
Essential Types of Bathroom Sealing Materials
Let’s talk about the main players in the bathroom sealing game. Silicone sealants are probably the most popular choice for bathrooms. They’re excellent at resisting moisture and can handle the expansion and contraction that happens with temperature changes. Plus, they’re resistant to mold and mildew, which is huge in a humid environment. But they do have drawbacks – they’re harder to paint over and can be tricky to work with when you want a clean, neat appearance. Polyurethane sealants offer another option. These are incredibly durable and can handle a lot of stress. They’re particularly good for areas that experience a lot of movement, like around bathtubs or showers where the structure might shift slightly. However, they tend to be more expensive and can yellow over time. Acrylic latex sealants are often used for interior applications. They’re easy to apply, paintable, and affordable. But they’re not ideal for high-moisture areas like behind a shower or around a bathtub. They’re better suited for less demanding spots like around vanity tops or between tiles. There are also specialized sealants designed for specific tasks – like bathroom-specific formulas that incorporate antimicrobial agents to fight mold growth. Each type has its strengths and weaknesses, and choosing the right one depends on exactly where you’re applying it and what conditions it will face. For instance, if you’re sealing around a shower niche, you’ll want something that can handle constant moisture and temperature changes, while a corner joint might only need a simple, easy-to-apply solution.
Where to Apply Different Sealants
Not all bathroom areas are created equal when it comes to sealing requirements. Around your bathtub, you’ll want to use a sealant that can handle constant exposure to water and steam. This is typically where silicone or polyurethane works best. The area between your bathtub and surrounding tiles needs a sealant that won’t deteriorate from regular use and moisture. If you’re working around your shower, consider using a high-quality silicone that resists mold and mildew. These areas see the most moisture and need the most robust protection. For vanity areas, you have more flexibility. Acrylic latex sealants can work well here, especially if you plan to paint over them. Around windows and doors, you’ll want a sealant that provides weatherproofing along with flexibility. Sometimes, a combination approach works best – using different sealants in different locations based on their specific needs. For example, you might use silicone around the tub and shower area, but use a different product around the vanity top. The key is understanding that each location has different demands. A sealant that works perfectly for a small gap in a bathroom cabinet might not hold up in a high-moisture area. Think of it like choosing the right shoes for different activities – what works for walking around the house isn’t necessarily what you’d want for hiking in the rain.
Key Factors to Consider Before Choosing
Before you head to the hardware store, there are several important factors to evaluate. First, consider the environment where you’ll be applying the sealant. Is it going to be in direct contact with water? How much moisture will it encounter? High humidity areas need more robust solutions. Next, think about the materials you’re sealing together. Some sealants work better with certain substrates than others. Glass and ceramic respond differently to sealants than wood or metal. Also, consider the flexibility requirements. If the materials move relative to each other, you’ll need a sealant that can stretch and bend without cracking. Temperature variations matter too. Will your bathroom get extremely hot during summer showers or cold in winter? Some sealants perform better in certain temperature ranges. Budget considerations are important too. While you don’t want to skimp on quality, you also don’t want to overspend on something that doesn’t meet your needs. Finally, think about maintenance. Will you need to repaint or reseal the area in the future? Some sealants make this easier than others. It’s also worth noting that newer formulations often include additives like antimicrobial agents to combat mold and mildew growth. These features can be particularly valuable in bathroom applications where such issues are common. Remember, you’re not just buying a product – you’re investing in the long-term health of your bathroom space.
Application Tips for Best Results
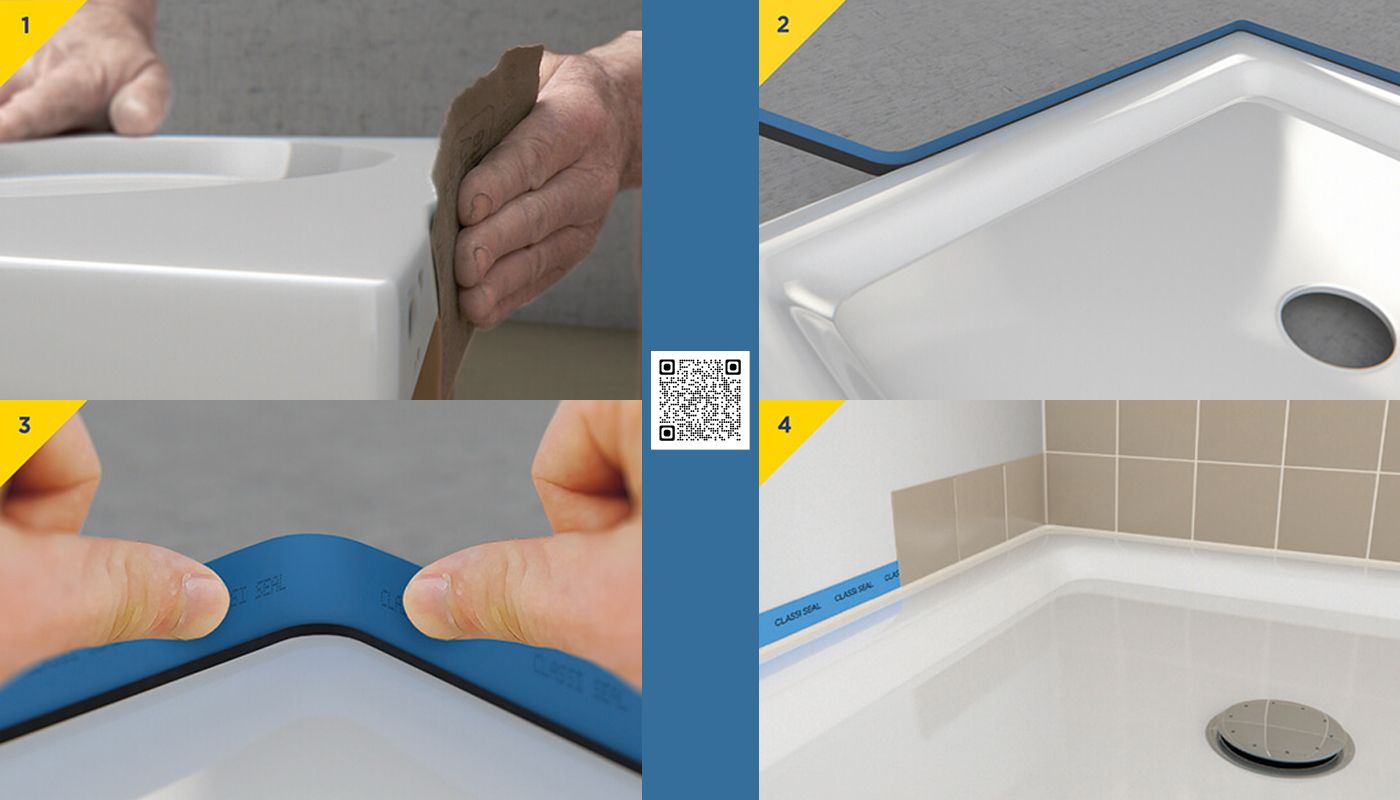
Even the best sealant will fail if you don’t apply it correctly. Preparation is everything. Clean the surfaces thoroughly before applying any sealant. Remove old caulk carefully, and make sure the area is dry and free of grease or dirt. Use a scraper or caulk removal tool to get rid of old material completely. For best results, apply sealant in thin, even layers. Thick applications often lead to poor adhesion and can crack or peel more easily. The general rule is to apply about 1/8 inch thick for most applications. Work in small sections to avoid the sealant drying before you can finish. Temperature and humidity affect how sealants cure. Most manufacturers recommend applying sealants when temperatures are between 50 and 75 degrees Fahrenheit. Avoid applying in direct sunlight or very humid conditions. Allow adequate curing time before exposing the sealed area to water or heavy use. This can range from a few hours to several days depending on the product and conditions. Some sealants require specific conditions to cure properly, so always check the manufacturer’s instructions. Don’t forget to smooth the sealant after application. Use a wet finger or specialized tool to create a clean, professional-looking finish. This not only looks better but also helps ensure proper adhesion and prevents water from getting underneath the sealant. A little extra effort now can prevent big problems later.
Common Mistakes to Avoid
Even experienced DIYers make mistakes when sealing bathrooms. One of the most common errors is not preparing the surface properly. It’s amazing how many people skip cleaning and drying steps, thinking it’s unnecessary. But any residue, grease, or moisture will prevent proper adhesion. Another frequent mistake is using the wrong type of sealant for the job. Using standard household caulk in a high-moisture bathroom area is like trying to use a paper towel to clean up a spill – it might work temporarily, but it’s not the right tool for the job. Many people also don’t allow enough time for curing. Rushing the process often leads to premature failure. Applying too thick a layer is another problem. Thick sealant tends to crack and peel more easily than thin, even applications. Not considering the compatibility of sealant with surrounding materials is also a big issue. Some sealants can discolor or damage certain surfaces, especially painted or finished materials. Forgetting to remove old caulk completely before applying new sealant leads to poor bonding and eventual failure. And let’s not forget about timing – applying sealant in extreme weather conditions can cause problems. Hot sun, cold temperatures, or high humidity can all interfere with proper curing. These mistakes are easily avoidable with a bit of preparation and attention to detail. Think of it like cooking – you wouldn’t try to make a perfect dish without following the recipe and taking proper steps. The same principle applies to bathroom sealing.
Choosing the right material for your bathroom sealing needs is really about understanding the unique challenges your space faces and matching those needs to the appropriate solution. It’s not just about finding something that works – it’s about finding something that works well for your specific situation. Whether you’re dealing with a minor touch-up or a full bathroom renovation, taking time to properly assess your needs and select the right sealant will pay dividends in the long run. Remember, a well-sealed bathroom is a happy bathroom – one that functions properly, looks great, and requires minimal maintenance. The investment you make in quality sealing materials and proper application pays off in reduced repair costs, better aesthetics, and peace of mind. Don’t let a small detail like sealing ruin your entire bathroom project. Take the time to learn about your options, consider your specific circumstances, and choose wisely. Your future self will thank you when you’re enjoying a perfectly sealed bathroom for years to come. After all, the difference between a bathroom that leaks and one that stays dry isn’t just about fancy tiles or beautiful fixtures – it’s about the invisible but crucial job that sealants do behind the scenes. So next time you’re planning a bathroom project, remember: the right sealant in the right place can make all the difference in the world.