Ever wondered how to get fresh air flowing in your bathroom or kitchen without dealing with complex wiring? You’re not alone. Many homeowners face this challenge, especially when they’re not comfortable working with electricity. But here’s the good news – installing an exhaust fan doesn’t have to be intimidating. With the right approach and a few smart techniques, anyone can tackle this project. Whether you’re dealing with a new installation or replacing an old fan, we’ll walk you through straightforward methods that work whether you’re a DIY beginner or someone who just wants to avoid the electrician.
Let’s face it – installing exhaust fans can seem like a daunting task, especially when you’re not familiar with electrical work. The thought of handling wires, circuits, and potentially dangerous connections might make your palms sweat. But what if we told you there are simple ways to get the job done safely and effectively without any electrical expertise? It’s true! There are several approaches that make this project accessible to everyone, regardless of their background with electricity. From pre-wired options to easy plug-in solutions, we’ll show you how to bring fresh air into your space without breaking a sweat or spending money on professional help.
Understanding Your Options Before You Start
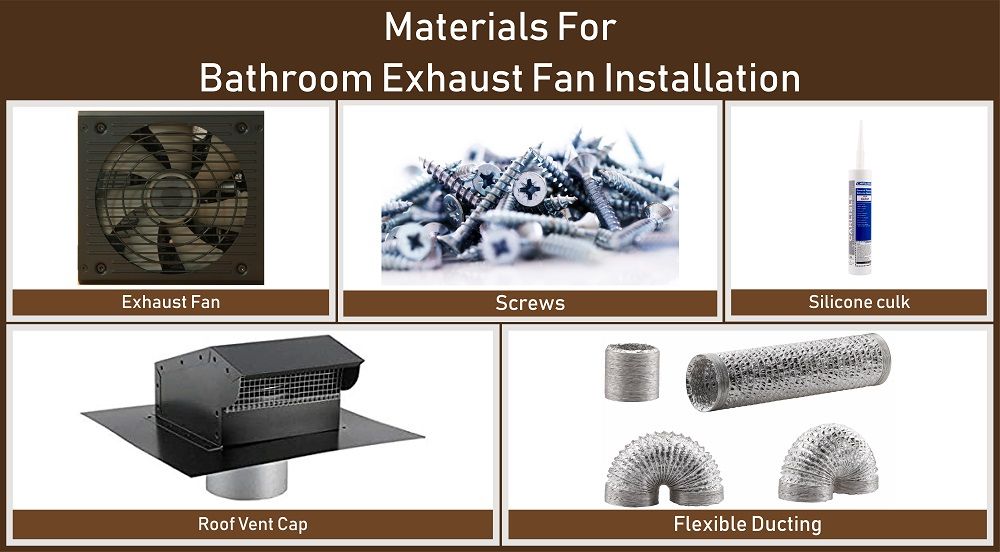
Before diving into any installation, it’s crucial to know what you’re working with. There are three main types of exhaust fans you might encounter, each requiring different approaches. The first category includes fans that come with pre-installed wiring. These are often found in newer homes or during major renovations. They typically have a wire nut connection that you simply attach to existing electrical components. The second type consists of fans designed for plug-and-play installation. These units have built-in cords and can be plugged directly into standard outlets. This is perfect for renters or those who want maximum flexibility. Finally, there are retrofit models that work with existing ductwork and electrical connections. Understanding which category your fan falls into will determine how you proceed. Think about the space you’re working with, the age of your home, and what tools you already have available. Sometimes the best approach isn’t necessarily the most expensive one – it’s the one that matches your situation perfectly.
Pre-Wired Fans: The Easiest Route for New Installations
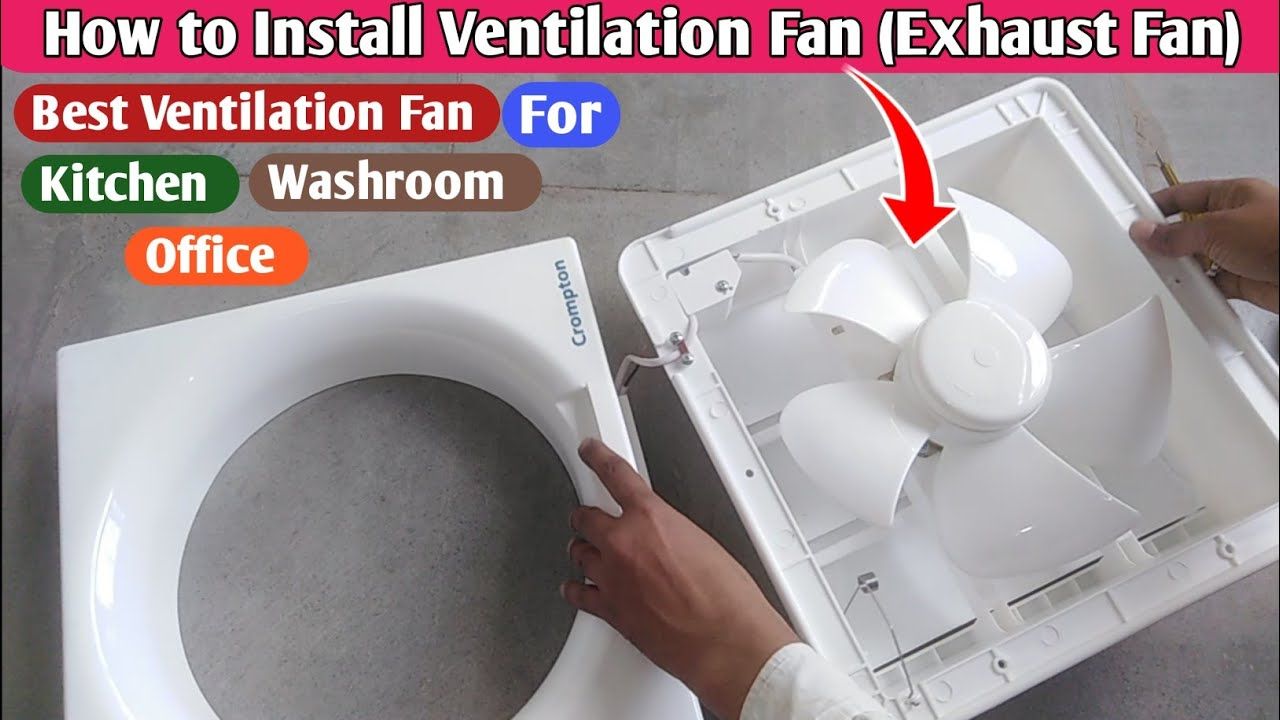
If you’re lucky enough to have a pre-wired exhaust fan, congratulations! This is by far the simplest installation path. These fans arrive ready to go with all necessary connections already made. You’ll typically find them connected to a junction box with standard electrical wires – usually black for hot, white for neutral, and green or bare copper for ground. The process involves matching these colors correctly to your existing house wiring. For instance, if you see a black wire on the fan and a black wire in your ceiling, you connect them together. This requires some basic understanding of electrical connections but nothing too complex. The key is to make sure everything is secure and properly insulated. When you’re connecting wires, twist them together clockwise, then cover with electrical tape. If you’re unsure about anything, it’s always better to double-check than risk a mistake that could cause problems later. These fans often come with detailed instructions that make the process even easier. Don’t skip reading them – they’re there for a reason. Some people assume these installations are too risky, but when done carefully and following manufacturer guidelines, they’re quite safe.
Plug-In Solutions: Perfect for Renters and Quick Fixes
For those who rent or prefer flexible solutions, plug-in exhaust fans offer a fantastic alternative. These units have a cord that plugs directly into a standard electrical outlet, eliminating the need for any hardwiring. The installation is as simple as plugging in your appliance and turning it on. These fans are particularly useful in bathrooms or kitchens where you want to improve air circulation without committing to permanent changes. However, there are a few important considerations. First, make sure the outlet you choose can handle the fan’s power requirements. Most plug-in fans operate on standard household voltage, but it’s always wise to check the specifications. Second, consider the location of the outlet. You’ll want it close enough to reach the fan but far enough away to avoid water splashes. Many renters find these convenient because they can be moved or removed easily when they move. Some models even come with timer functions or humidity sensors that add extra convenience. While they may not provide the same powerful airflow as hardwired versions, they’re excellent for temporary situations or small spaces.
Retrofitting Existing Systems: Working With What You Have
Sometimes you’re not starting from scratch but rather updating or replacing an existing exhaust fan. Retrofitting means adapting to your current setup while bringing in new technology. The first step is to assess your existing installation. Look for signs of wear, damaged wiring, or outdated components. If you’re replacing an older model, you might find yourself working with different wire configurations or mounting systems. Modern retrofit fans often include features like LED lighting or digital controls that didn’t exist before. These upgrades can make the process more interesting and rewarding. The key is to take your time and understand each component before making connections. You’ll likely need to disconnect the old fan carefully, then match the new fan’s wiring to the existing setup. This might mean matching colors, sizes, or types of connectors. Some people find this part challenging, but taking photos beforehand helps immensely. If you’re ever unsure about compatibility, consulting with a hardware store specialist can save you from costly mistakes. Remember that safety always comes first, so don’t hesitate to call for help if something seems wrong.
Essential Tools and Safety Considerations
Even though we’re focusing on non-electrical approaches, having the right tools makes everything much smoother. You’ll want a basic toolkit including screwdrivers, a stud finder, a drill with bits, and possibly a voltage tester. While voltage testing isn’t always required with plug-in fans, it’s good practice for any electrical work. Always turn off power at the breaker before beginning any installation, even if it’s just a plug-in unit. This simple step prevents accidents and gives you peace of mind. If you’re working with pre-wired fans, ensure all connections are tight and secure. Loose connections can cause problems over time, leading to poor performance or safety issues. Additionally, don’t forget about ventilation needs. Properly sizing your fan to match your room’s square footage ensures effective air movement. A fan that’s too small won’t adequately ventilate the space, while one that’s oversized can create unnecessary noise or energy consumption. Reading the product manual thoroughly helps prevent common mistakes that many beginners make.
Common Mistakes to Avoid and Troubleshooting Tips
Even experienced DIYers sometimes run into trouble during installation. One of the most frequent errors is misreading wiring instructions or assuming all fans work the same way. Every brand has its quirks, so patience pays off. Another common issue occurs when people try to rush through the process, leading to loose connections or improper mounting. Take your time with each step, and remember that a well-installed fan lasts longer and works better. If your fan doesn’t turn on after installation, start by checking the power source. Is the outlet working? Did you properly connect all wires? Sometimes the problem is simpler than it appears. Also, be mindful of ducting – improper ventilation can lead to moisture buildup or poor performance. If you notice unusual noises, vibrations, or inadequate airflow, recheck your installation. Minor adjustments often solve these issues. When in doubt, don’t hesitate to consult online forums or local hardware stores. Many people have faced similar challenges and can offer helpful advice. The key is learning from others’ experiences and applying that wisdom to your own project.
Installing an exhaust fan doesn’t have to be scary or require expensive professional services. With the right approach and some basic knowledge, anyone can accomplish this task successfully. Whether you’re working with pre-wired units, plug-in models, or retrofitting existing systems, there are straightforward paths forward. The most important thing is to start with a clear plan, gather proper tools, and prioritize safety throughout the process. Don’t let fear of electricity stop you from improving your home’s air quality. Many people find the satisfaction of completing this project themselves incredibly rewarding. Plus, you’ll have a better understanding of how your home’s ventilation system works. Remember that every expert was once a beginner, and with practice, these skills become second nature. So go ahead and tackle that exhaust fan installation – you’ve got this!
![How To Vent A Bathroom Fan Through The Wall [Complete Guide] - Hvacseer.com intended for Install Exhaust Fan Without Electrician](https://dahomengarden.com/wp-content/uploads/2025/10/how-to-vent-a-bathroom-fan-through-the-wall-complete-guide-hvacseer-com-intended-for-install-exhaust-fan-without-electrician.jpg)