
Picture this: You stand at the edge of your backyard, armed with a lukewarm mug of coffee and a grand vision. Between the overgrown hostas and the sun-baked patch of lawn, you picture a tranquil pathway winding toward a quiet seating nook. It sounds simple enough—just a few stones or some gravel, right? Then you call your first contractor, or you price out pallet loads of natural flagstone at the local nursery, and reality hits you like a cold splash of water. One estimate comes back at a modest $800 for a weekend DIY project, while another professional quote lands at a staggering $9,000.
Why on earth does a strip of walkway stretching thirty feet across a yard command such wildly unpredictable price tags? It is a question that mystifies homeowners every spring. You aren’t just paying for the material you can see on the surface. You are paying for a subterranean engineering feat—excavation, geotextile fabrics, crushed aggregate bases, precise grading, drainage channels, and heavy labor. A garden path is a permanent structural addition to your property, and its cost is dictated by a complex cocktail of physics, logistics, and raw material economics.
The evolution of the backyard garden path reflects our changing relationship with domestic outdoor spaces. Once treated as purely utilitarian dirt tracks or simple wooden boardwalks, garden paths have transformed into essential components of landscape architecture. In modern suburban and urban settings, a typical professional path project ranges anywhere from $4,800 to $12,000, depending heavily on linear footage, site complexity, and local labor markets. Understanding this financial spectrum requires looking past the surface sticker shock and examining the structural anatomy of what lies beneath your feet.
The Anatomy of Pathway Expenses: Materials, Base Prep, and Labor
To understand why garden path costs swing so violently, you have to break down the hardscape budget into its three foundational pillars: materials, sub-base preparation, and labor. Each pillar carries its own financial variables that can inflate or deflate your final project total. When people look at a path, they usually focus entirely on the surface layer—the bluestone, the pavers, the pea gravel, or the bricks. Yet, the surface layer is often only a fraction of the total investment.
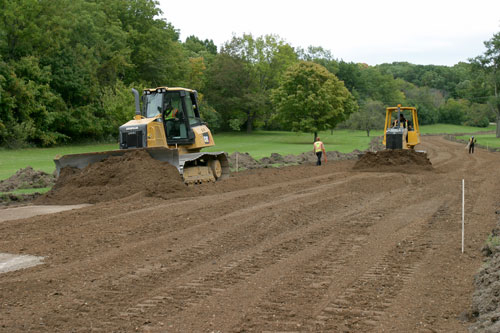
Material costs run the gamut from ultra-budget options like crusher run and decomposed granite, which cost between $1 and $5 per square foot installed, up to premium imported slate, hand-cut porphyry, or custom concrete pavers that push past $25 per square foot. However, a cheap surface material laid over poorly prepared soil is a recipe for frost heaving, shifting stones, and muddy puddles within six months. Professional installation demands robust sub-base preparation. Excavating four to six inches of organic topsoil, hauling away the spoils, laying down stabilization geotextile fabric, and compacting layers of dense-graded aggregate cost serious money in equipment rentals, disposal fees, and sweat equity.
Labor is the final massive variable. Hardscaping is brutal, backbreaking physical labor. Hauling wheelbarrows of gravel up a steep slope, cutting dense natural stone with a diamond-blade wet saw, and leveling individual pavers with a rubber mallet requires skill and endurance. Geographic location plays a massive role here, too. Labor rates in metropolitan areas with high costs of living drive installation numbers up significantly compared to rural regions. When you combine regional labor differentials with the sheer tonnage of stone required for a mid-sized path, you begin to see why two quotes for the exact same layout can look like they belong to entirely different planets.
Unpacking the Cost Spectrum Across Different Pathway Styles
Not all paths are created equal, and the style you choose dictates your financial commitment more than almost any other factor. Informal pathways constructed from loose aggregates—such as pea gravel, crushed stone, or wood mulch—sit comfortably at the economic entry point. These DIY-friendly options are forgiving to install, require minimal heavy equipment, and let you feather materials directly into garden beds. Even so, they demand constant maintenance, including weed suppression membranes, seasonal top-offs, and rigid metal or plastic edging to keep the stones from spilling into your lawn.
Moving up the cost ladder brings you to stepping stone pathways and mortared or unmortared paver systems. Stepping stones offer a charming, organic look that lets groundcovers like creeping thyme or miniature clover sprout between the gaps. Depending on whether you choose mass-produced concrete pavers or thick, hand-chiseled flagstones, stepping stone setups can range from a few dollars per stone to hundreds of dollars for large, irregular premium slabs. The labor here shifts toward precise placement, ensuring each stone is bedded securely into a sand-and-gravel pocket so it never wobbles when stepped on.
At the high end of the spectrum sit formal flagstone pavers, brick-in-concrete installations, and integrated hardscape walkways featuring custom lighting, drainage grates, and retaining borders. These paths are permanent civil engineering projects. They require poured concrete sub-bases, professional mortar mixing, precision cuts around curves, and rigorous pitch calculations to ensure stormwater flows safely away from your home’s foundation. While the upfront investment is steep, these installations can last for decades with virtually zero structural degradation, adding tangible resale value to your property.
A Step-by-Step Blueprint for Planning and Budgeting Your Path
Building a garden path without a structured financial and logistical plan is a fast track to budget overruns and half-finished backyard eyesores. To keep your project on track, follow a systematic approach that accounts for every phase of construction from initial layout to final cleanup.
- Step 1 (Mapping and Layout): Walk your yard during different times of day to observe natural foot traffic patterns. Mark your proposed path using spray paint or a garden hose, then measure the exact length and width to calculate total square footage.
- Step 2 (Site Assessment and Drainage Evaluation): Examine soil conditions, tree roots, and slope angles. Identify low points where water pools so you can budget for French drains or proper crown grading before laying any hard materials.
- Step 3 (Material Selection and Sourcing): Balance your aesthetic desires with practical maintenance realities. Request physical samples of gravel, pavers, or stone to test their texture, color consistency, and slip resistance when wet.
- Step 4 (Excavation and Sub-Base Calculation): Determine whether you will rent a mini-excavator or dig by hand. Calculate the tonnage of crushed stone base material (typically 4 inches deep) and coarse bedding sand (1 inch deep) required for solid structural support.
- Step 5 (Installation and Edging): Install heavy-duty landscape fabric to stop weed intrusion, anchor robust metal or poly edging securely with steel spikes, lay your base aggregates in compacted lifts, and set your surface materials with precise leveling checks.
Navigating Hidden Expenses and Common Installation Pitfalls
Even the most meticulously planned landscaping budgets can derail when hidden expenses pop up mid-project. Experienced contractors know that the moment a shovel breaks ground, surprises are bound to hide beneath the turf. Anticipating these pitfalls and knowing how to work around them separates a smooth project from a financial disaster.
- Pitfall 1 (Underestimating Excavation and Disposal Costs): Homeowners often forget that removing four inches of dense clay soil generates massive piles of heavy earth. Workaround: Always factor bin rental or dump trailer fees into your initial budget, and check if local topsoil yards will accept clean fill for free.
- Pitfall 2 (Neglecting Underground Utilities): Striking a buried irrigation line, low-voltage landscape lighting cable, or fiber-optic line will instantly halt your project and incur emergency repair bills. Workaround: Always call your national utility notification center (such as 811 in the U.S.) to mark lines at least a few days before digging.
- Pitfall 3 (Skipping Proper Edge Restraint): Gravel and paver paths fail prematurely when stones migrate outward into surrounding garden mulch. Workaround: Invest in commercial-grade aluminum or heavy steel edging anchored deeply with spikes rather than cheap plastic alternatives that warp in summer heat.
- Pitfall 4 (Ignoring Drainage and Frost Heave): Water trapped beneath a hardscape path expands when freezing, lifting stones unevenly and destroying your flat surface. Workaround: Always grade your sub-base away from foundations and use a compacted crushed-stone aggregate base that allows water to percolate downward safely.
- Pitfall 5 (Failing to Account for Waste Factor): Ordering the exact square footage of stone or pavers guarantees you will run short due to cut waste around curves and corners. Workaround: Always add a 10% to 15% waste and breakage buffer to your total material order.
Balancing Upfront Costs with Long-Term Maintenance Realities
When evaluating garden path budgets, most people focus exclusively on the transaction that happens at checkout or on the contractor’s final invoice. However, the true cost of a pathway spans its entire lifecycle. A cheap material choice today can easily translate into expensive, labor-intensive upkeep tomorrow, while a higher initial investment can buy you decades of maintenance-free enjoyment.
Consider the ongoing relationship you will have with your pathway. Loose gravel paths are wonderfully inexpensive to install—often costing under $3 per square foot for materials—but they demand recurring labor. Weeds inevitably find their way through the landscape fabric, leaves must be blown or raked out of the gravel carefully without displacing the stones, and thin spots require annual replenishment with fresh aggregate hauled in wheelbarrows. Over a ten-year window, the cumulative cost of weed killer, manual labor, and top-off gravel creeps upward.
Conversely, a wet-laid natural flagstone path on a poured concrete or compacted crushed-stone base requires minimal maintenance beyond an occasional sweep and a spring pressure wash to clear away algae. The durability of high-end masonry means you are paying once for a permanent architectural feature. When viewed through this multi-year lens, spending more on professional sub-base preparation and premium materials is often the more economical choice for homeowners planning to stay in their homes for the long haul.
Strategic Cost-Saving Strategies Without Sacrificing Quality
Wanting a stunning garden path does not mean you have to remortgage your house. Strategic compromises allow you to achieve professional-grade aesthetics while keeping your bank account intact. The secret lies in identifying where you can safely cut costs and where you must never compromise on structural integrity.
One of the most effective ways to lower your budget is through a hybrid installation approach. You can hire a professional contractor to handle the heavy, critical civil engineering work—such as major excavation, heavy grading, and establishing the structural crushed-stone sub-base—while you take on the more forgiving surface-level work, like spreading pea gravel or setting individual stepping stones. This ensures the foundation of your path is structurally sound without paying peak hourly labor rates for every single square foot of surface laying.
Another smart strategy is sourcing materials locally rather than specifying imported stone shipped across continents. Regional quarries offer stunning local granites, sandstones, or river rocks that match the natural geological context of your region at a fraction of the cost of exotic imports. Furthermore, buying excess overstock materials from local masonry yards or online marketplace liquidation boards can yield premium pavers and flagstones at steep discounts if you are willing to inspect the palettes yourself and handle your own transport.
Building a garden path is ultimately about defining the way you experience your outdoor space. It transforms an unruly patch of earth into an intentional journey, guiding footsteps past your favorite botanical displays and turning a simple backyard stroll into an immersive sensory ritual. While the financial investment can vary wildly from a weekend DIY project costing a few hundred dollars to a bespoke masonry installation running into the thousands, every dollar spent is an investment in the usability and beauty of your property.
By understanding the hidden mechanics of sub-base preparation, recognizing the trade-offs between different surface materials, and planning realistically for site prep and drainage, you strip away the mystery of hardscape pricing. You no longer look at a project estimate with apprehension; instead, you evaluate it as a clear reflection of craftsmanship, labor, and materials.
As you step back out to your yard with your coffee and your measuring tape, remember that patience is your greatest asset. Take the time to map your drainage, respect the importance of a solid crushed-stone foundation, and choose materials that honor both your aesthetic vision and your financial reality. Your garden path won’t just connect two points in your yard—it will anchor your entire landscape design for years to come.