
You know that feeling when you look out your window and just sigh? That was me every single morning for three years. My backyard wasn’t just messy; it was a proper jungle. Vines were choking the fence, weeds had taken over what used to be a patio, and the whole space felt hostile. It wasn’t a place to relax. It was a place I avoided. But here’s the thing about ignoring problems—they don’t go away. They just get bigger. And uglier.
I didn’t have thousands of dollars to hire a landscaper. Who does these days? With inflation still biting in 2026, spending big on curb appeal felt impossible. So I decided to do it myself. The goal was simple: create a spot where I could drink my coffee without feeling like I was being watched by invasive ivy. The budget? Strictly under $500. No cheating. No "oh, I already had this." Just cold, hard cash and a lot of sweat equity.
It sounds crazy, right? Transforming a disaster zone on a shoestring budget. But it’s not only possible, it’s actually kind of freeing. You stop worrying about perfection and start focusing on function. You learn to see potential in trash. You realize that plants don’t care if their pot is from a high-end boutique or a garage sale. They just want sun and water. This journey wasn’t just about fixing a yard. It was about reclaiming a piece of my home. And honestly? It changed how I see outdoor spaces forever.
The Great Clean-Up: Sweat Equity is Free
Before you buy a single flower, you have to face the mess. This is the part most people skip because it’s hard work. Don’t skip it. I spent the first two weekends just clearing debris. I didn’t rent a dumpster—that would have blown the budget instantly. Instead, I used the local municipal green waste pickup, which is free in most cities if you separate your organic matter correctly. Check your local sanitation department’s website for 2026 schedules; many have expanded curbside composting services now.
I started with the big stuff. Dead branches, old broken furniture, piles of leaves that had turned into sludge. I wore thick gloves and sturdy boots. Safety first, always. Then came the weeds. I didn’t use expensive chemical herbicides. They’re pricey and bad for the soil. Instead, I used the old-school method: pulling. For the stubborn patches, I laid down cardboard boxes (free from grocery stores) and covered them with mulch. This "sheet mulching" technique smothers weeds without killing your bank account. It takes time, sure. But it works.
The psychological shift here is huge. As I cleared the ground, I could finally see the shape of the yard. I realized I had more space than I thought. The overgrowth had been hiding a decent-sized flat area near the back fence. That became my target zone. By doing the heavy lifting myself, I saved easily $300-$400 in labor costs. That money stayed in my pocket for the fun stuff later. Plus, there’s something deeply satisfying about seeing a clean slate emerge from chaos. It gives you momentum.
Designing on a Dime: Less is More
Once the land was bare, I had to decide what to build. Professional landscape designs cost hundreds, sometimes thousands. I couldn’t afford that. So I grabbed some graph paper and a pencil. I sketched out three zones: a seating area, a small garden bed, and a pathway. Simplicity was key. Complex curves require edging materials and precise cutting. Straight lines? Much easier. And cheaper.
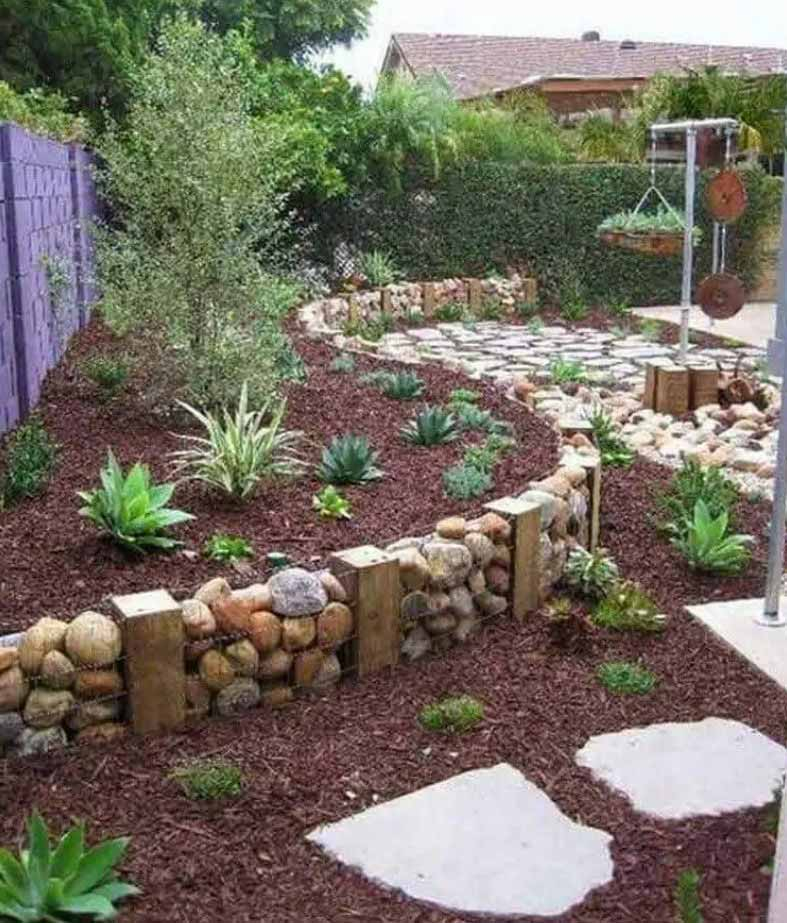
I focused on "hardscaping" using recycled materials. This is where the magic happens. I scoured Facebook Marketplace and local Buy Nothing groups. People are constantly giving away old bricks, pavers, and even leftover gravel. I found a neighbor tearing out an old walkway who let me take their cracked but usable concrete pavers for free. It took some hauling, but it cost me zero dollars. These became the foundation of my patio.
For the layout, I kept it intimate. A huge patio feels empty if you can’t fill it with nice furniture. A small 8×8 foot space feels cozy and intentional. I used string and stakes to mark the boundaries. Then I leveled the ground. This is crucial. If your base isn’t flat, your pavers will wobble. I used sand from a local hardware store—about $5 for a bag—to level the dirt before laying the pavers. It’s not rocket science. It’s just patience. By keeping the design simple and scavenging materials, I kept my hardscape costs under $50.
Thrift Store Treasures and DIY Furniture
Furniture is usually the biggest budget buster. A nice outdoor set can run $1,000 easy. Not happening. I hit up thrift stores, estate sales, and curb alerts. The key is looking past the ugly. I found a solid wood bench at a garage sale for $15. It was scratched and the stain was peeling. But the structure was sound. A little sandpaper, a coat of outdoor-rated sealant ($20), and some new cushions made from indoor foam scraps covered in outdoor fabric remnants, and it looked brand new.
I also got creative with pallets. Many warehouses give these away for free. I sanded them down thoroughly to avoid splinters and stacked two to create a low coffee table. A bit of weather-resistant paint in a dark charcoal color made them look modern and sleek. For seating, I built simple box seats using cedar fence pickets. Cedar is naturally rot-resistant, so it lasts longer without expensive treatments. I bought just enough wood to make two benches, costing about $40 total.
The secret to making cheap furniture look good is cohesion. I painted all the wood elements in the same two tones: natural cedar and charcoal gray. This unified the look. It didn’t matter that one piece was a rescued bench and another was a DIY pallet table. They belonged together. I also added outdoor pillows. I didn’t buy new ones. I bought waterproof covers on clearance and stuffed them with old indoor pillows I no longer used. It’s resourceful. It’s eco-friendly. And it saves a ton of cash.
Plant Smart: Native and Divided
Plants can drain your wallet fast if you buy everything new from a nursery. I avoided that trap. First, I looked at what I already had. I dug up the perennials that were surviving in the jungle. Hostas, daylilies, and ornamental grasses. I divided them. Most perennials love being split. One clump becomes three or four. This gave me instant volume in my new garden beds for free.
For the rest, I went native. Native plants are adapted to our local climate. They need less water, less fertilizer, and less coddling. In 2026, water conservation is a bigger deal than ever, so this is smart gardening. I visited local plant swaps and community garden sales. These events are goldmines. People often have extra seedlings they’ll sell for a dollar or two. I picked up lavender, coneflowers, and black-eyed susans. They’re tough, pretty, and attract pollinators.
I also prioritized multi-season interest. I didn’t just want spring flowers. I wanted something to look at in fall too. Ornamental grasses provide texture in winter. Evergreen shrubs (found cheaply at end-of-season sales) provide year-round structure. By mixing divided plants, swapped finds, and strategic clearance buys, I filled three large garden beds for under $75. It looks lush and established, not sparse and sad. The trick is patience. Plants grow. Give them time.
Lighting and Atmosphere: The Evening Magic
Daytime is great, but the evening is when a yard becomes a retreat. Lighting sets the mood. String lights are the classic choice, and for good reason. They’re affordable and effective. I bought two 50-foot strands of LED bistro lights. LEDs are energy-efficient and last forever. I hung them in a zig-zag pattern above the seating area. I used existing trees and fence posts to anchor them. No need for expensive poles. Total cost: $40.
But string lights aren’t enough. You need layers. I found solar-powered path lights at a discount store. They’ve gotten much better in recent years. The newer models in 2026 hold a charge well and emit a warm, inviting glow rather than that harsh blue light. I placed six of them along the edge of the patio. They define the space and prevent tripping. Cost: $25.
For a focal point, I made a simple fire pit area. I didn’t buy a fancy metal bowl. I used a ring of the leftover pavers to create a contained circle. Inside, I used a cheap metal fire basket from a hardware store ($30). It keeps the embers contained and safe. Around it, I placed a few large stones as extra seating. Fire adds warmth, both physically and emotionally. It draws people in. It makes the space feel finished. With the lights and the fire, the yard transformed from a daytime project to a nighttime sanctuary.
The last $100 of my budget went to the details that make a space feel lived-in. I bought a large outdoor rug. Yes, outside. Rugs define zones just like indoors. I found a polypropylene rug on sale for $40. It’s durable, washable, and adds color and softness underfoot. It hides the imperfections in the paver work too. Smart move.
I also added vertical interest. Bare fences are boring. I hung some hanging baskets with trailing plants like pothos (brought inside in winter) or hardy ferns. I used S-hooks and existing fence rails. No drilling required. I also leaned a large mirror against the fence. Mirrors reflect light and make small spaces feel bigger. It was an old interior mirror I sealed with clear nail polish around the edges to protect it from moisture. It’s a quirky, artistic touch that sparks conversation.
Finally, I added practical storage. A deck box can be expensive. I used a large, watertight plastic bin and painted it to match the furniture. It holds cushions, tools, and gardening gloves. Keeping clutter hidden is essential for a relaxing vibe. If you see your rake and hose, you think about chores. If you see flowers and lights, you think about peace. These final touches tied everything together. They made the space feel intentional, not just thrown together.
So, did I stick to the budget? Let’s do the math. Cleanup: $0 (sweat). Hardscape materials: $50 (sand and minor supplies). Furniture: $75 (wood, sealant, fabric). Plants: $75. Lighting and Fire: $95. Decor and Rug: $80. Total: $375. I came in $125 under budget. That extra money? I used it to buy a really nice bottle of wine and some glasses to enjoy in my new retreat.
This project taught me that you don’t need money to create beauty. You need vision, effort, and a willingness to get your hands dirty. The yard isn’t perfect. There are still a few weeds popping up. The pavers aren’t perfectly aligned. But it’s mine. It’s peaceful. And it cost less than a month’s rent for many people. If you’re staring at an overgrown mess right now, don’t despair. Start small. Clear one corner. Find one piece of furniture. Plant one flower. The rest will follow. Your retreat is waiting.