
You’ve seen them on social media. Those perfect, glowing circles of stone where friends gather, marshmallows roast, and the stress of the week just melts away into the night air. It looks simple enough, right? Just stack some rocks, light a fire, and boom—you have a centerpiece for your backyard. But then you start looking at prices. And suddenly, that "simple" project feels like it might cost as much as a used car. Or maybe you’re worried it’ll look cheap if you don’t spend a fortune.
Here is the truth: building a fire pit doesn’t have to break the bank. In fact, doing it yourself is one of the best ways to save money while getting exactly what you want. But you need to know where every single dollar goes. We aren’t just talking about the bricks. We are talking about the sand, the glue, the permits, and the stuff you forget until you are halfway through digging. Let’s pull back the curtain on the actual costs for 2026. No fluff. Just real numbers and real advice.
The Hidden Foundation Costs You Can’t Skip
Most people make a huge mistake right at the start. They buy the pretty stones and forget about what goes underneath. You can’t just build a fire pit on grass or dirt. It will sink, tilt, and eventually crack. You need a solid base. This is the unsexy part of the project, but it is arguably the most important. For a standard 3-to-4-foot diameter pit, you are looking at about $50 to $100 just for the foundation materials.
You will need gravel for drainage. This usually costs around $5 to $8 per bag, and you’ll likely need four or five bags. Then there is the paver base or sand to level everything out. That’s another $20 or so. If you skip this step to save cash, you are borrowing trouble from your future self. A wobbly fire pit is a dangerous fire pit. Also, consider the labor. Are you digging this hole yourself? If you hit rock or hard clay, you might need to rent a small auger or pickaxe, which adds another $30 to $50 to your tally. It adds up fast when you aren’t expecting it.
Don’t forget the fire ring itself. You can’t just burn wood directly on concrete or stone; the heat will cause it to explode or crack. You need a metal fire ring insert. These range from $40 for a basic steel ring to over $150 for heavy-duty, rust-resistant options. In 2026, prices for steel have stabilized somewhat, but quality still costs. Buying the cheapest ring might mean replacing it in two years. Spending a bit more now saves you headache later. So, before you even lay your first decorative brick, you have already spent roughly $150.
Choosing Your Materials: Stone vs. Brick vs. Concrete
Now comes the fun part: picking what your fire pit actually looks like. This is where your budget can either stay tight or spiral out of control. The most common option is concrete retaining wall blocks. They are easy to work with because they often interlock, meaning you might not even need mortar. A single block costs between $2 and $4. For a average-sized pit, you will need about 20 to 30 blocks for a single layer, or double that for a taller, more impressive look. Total cost? Around $60 to $120.
Natural stone is beautiful, but it is tricky. It is irregular, so you spend hours fitting pieces together like a puzzle. It also requires mortar to hold it in place. While the stone itself might cost similar to blocks ($100–$200 depending on sourcing), the extra time and the cost of mortar bags ($10 each) add up. Plus, if you mess up, you can’t just un-stack it. You have to chip it apart. For beginners, stick to uniform blocks. They are forgiving and look clean and modern.
Then there is brick. Old-school red brick gives a classic vibe. However, you must use fire-rated bricks for the inside layer. Regular bricks will crumble under high heat. Fire bricks cost significantly more, often $3 to $5 each. You might only need a few for the inner lining, but that adds $30–$50 quickly. Mixing materials is a trend in 2026, like using stone on the outside and brick on the inside. It looks high-end but requires careful planning. Always calculate 10% extra material for breakage. You will drop one. It is inevitable. Plan for it so you don’t have to run back to the store mid-project.
The Glue That Holds It All Together: Mortar and Adhesives
If you are using interlocking blocks, you might think you can skip this section. Don’t. Even if the blocks lock together, adding construction adhesive between the layers makes the structure rigid and safe. A tube of high-heat construction adhesive costs about $8 to $12. You will probably need two or three tubes. That is a small cost, $30 max, but it ensures your pit doesn’t shift when someone leans on it.
If you are using stone or brick, you need mortar. Do not use regular brick mortar for the inside of the pit. You need refractory mortar or high-heat mortar. This stuff is designed to withstand temperatures over 2000 degrees Fahrenheit. Regular mortar will turn to dust after a few fires. A 50-pound bag of high-heat mortar runs about $15 to $25. You likely won’t need a full bag for a small pit, but you have to buy the whole thing. Share the leftover with a neighbor or save it for repairs.
There is also the issue of tools. Do you have a trowel? A level? A rubber mallet? If you are starting from zero, you need to buy these. A basic masonry trowel is $10. A good level is $20. A rubber mallet is $15. These are one-time purchases, but they are part of the project cost. If you already have a toolbox, great. If not, factor in another $50 for the basics. It is better to have the right tool than to try and improvise with a kitchen spoon and a hammer. Trust me on this one.
Safety First: Permits, Clearance, and Insurance Checks
This is the part nobody wants to talk about until it is too late. Rules. Many cities and homeowners associations (HOAs) have strict rules about fire pits. In 2026, many areas have tightened regulations due to wildfire risks and air quality concerns. You might need a permit. A permit can cost anywhere from $0 in rural areas to $100+ in strict suburban zones. Check your local municipal website before you dig a single hole. Ignorance is not an excuse if you get fined.
Even if you don’t need a permit, you need to follow safety codes. Generally, your fire pit needs to be at least 10 to 25 feet away from any structure, including your house, shed, or fence. It also needs to be on a non-combustible surface. This means if you are building it on a wooden deck, you are violating code and risking your home. You might need to build a concrete pad underneath, which adds to the cost. Measure twice, check local laws once.
Also, call your insurance agent. It takes five minutes. Ask if having a permanent fire pit affects your homeowner’s policy. In most cases, it doesn’t, but if you build it incorrectly or too close to the house, you could void your coverage in case of fire damage. It is free peace of mind. Some neighborhoods also have "burn bans" during dry seasons. Knowing this helps you decide if a wood-burning pit is worth it, or if you should consider gas. Speaking of which, let’s talk fuel.
Fuel Source Decisions: Wood vs. Gas vs. Electric
The classic choice is wood. It is cheap, smells amazing, and gives that authentic crackle. A bundle of firewood costs $5 to $10. If you have trees on your property, it might be free. But wood creates smoke, ash, and sparks. You need a spark screen ($20–$40) and poker tools ($15). You also need to store the wood somewhere dry. It is a high-maintenance option, but low upfront cost.
Gas fire pits are cleaner and easier. You push a button, and you have fire. No smoke, no ash. But the installation cost is huge. If you don’t have a gas line near your patio, running one can cost $500 to $1,500. You also need a professional to connect it in most places. The pit kit itself is more expensive, often $300 to $800 for a decent propane or natural gas unit. It is convenient, but the entry price is steep.
Electric fire pits are the new contender in 2026. They are safe, smoke-free, and can be used indoors or on covered patios where wood and gas are banned. They plug into a standard outlet. The units cost $200 to $600. There is no installation cost other than an electrician checking your outlet if it is far away. However, they lack the real flame feel. The heat is often just a fan blowing warm air. It is cozy, but it isn’t the same as a roaring fire. Choose based on your lifestyle. If you hate cleaning ash, go gas or electric. If you love the ritual, go wood.
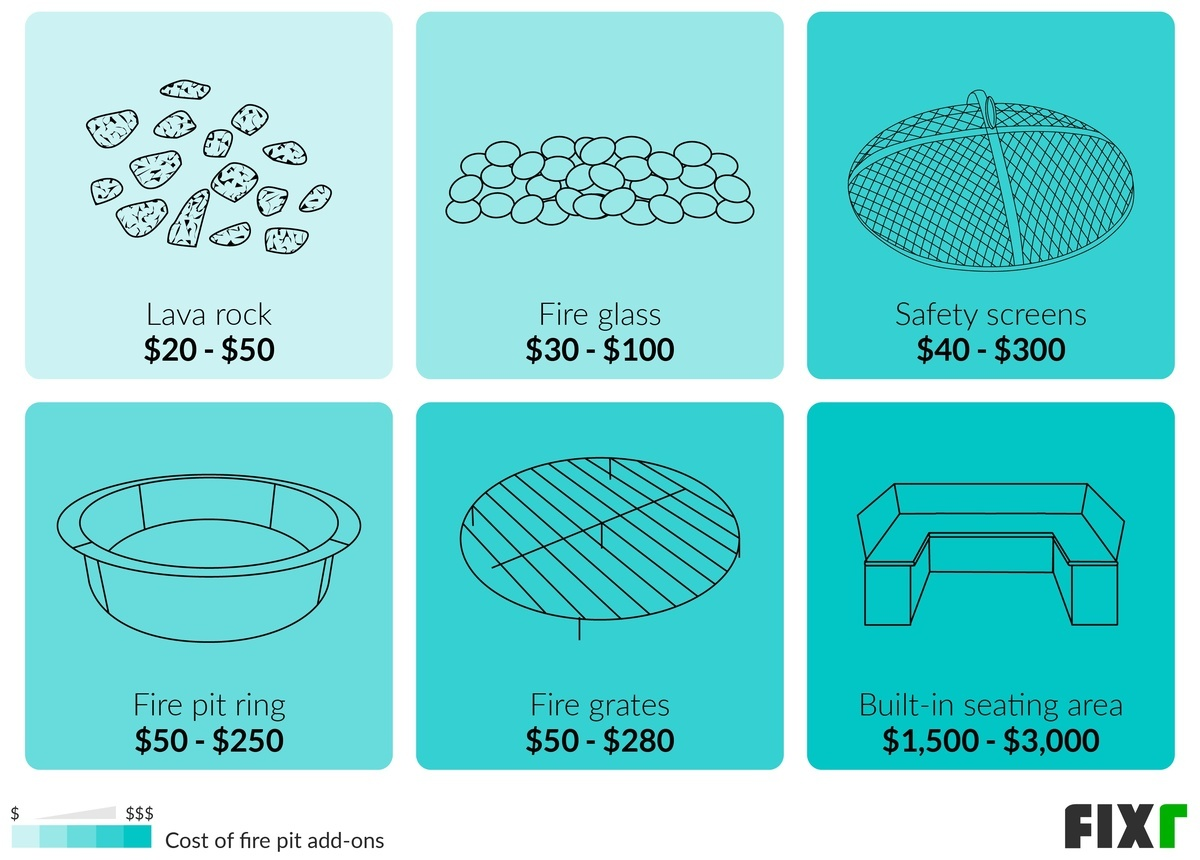
You built the pit. Now what? You can’t just stand around it. You need seating. This is where budgets really blow out. You can buy cheap plastic chairs for $20 each, but they melt if they get too close. Adirondack chairs are popular, costing $100 to $200 each. Building your own bench around the pit is a great DIY option. Using the same blocks as the pit, you can build a circular seat. It costs maybe $50 in extra blocks and a cushion.
Lighting is key for ambiance. Solar path lights are cheap, $2 each, but they are dim. String lights overhead create a magical feel. A good set of outdoor-rated string lights costs $30 to $50. Don’t forget a cover for the pit. Rain and snow will ruin your fire ring and fill the pit with mushy leaves. A fitted cover costs $20 to $40. It extends the life of your project significantly.
Finally, think about the surrounding area. Bare dirt around a fire pit turns to mud. You might want gravel, pavers, or mulch to define the space. A bag of decorative gravel is $5. You might need ten bags. That is $50. It makes the area look finished and intentional. These little things add up. A $300 pit can easily become a $600 project once you add seats, lights, and ground cover. But remember, you don’t have to do it all at once. Build the pit first. Add the rest over time.
Building a fire pit is more than just stacking stones. It is about creating a space for connection. When you break down the costs, it is manageable. The base, the materials, the adhesive, the safety checks, the fuel, and the decor. Each piece has a price, but each piece adds value. In 2026, doing it yourself is still the smartest way to get a high-quality result without the contractor markup.
Take your time. Measure carefully. Check your local rules. And don’t be afraid to start small. You can always add more later. The goal is not to spend the most money. The goal is to sit by the fire, watch the sparks fly, and enjoy the company of the people you love. That part? That is priceless. But the stones? Those are just $150. Go build something warm.